
How to Draw The Sky. When you mention heaven to someone, a different image can appear in their mind depending on their point of view.
Also, check our unicorns for coloring.
Some may envision a clear sunny day, or others conjure up a vision of huge rain clouds filling the sky.
The sky can look different under different conditions, so it has appeared in many artworks and made people wonder how to learn to draw the sky.
How to Draw The Sky
Step 1
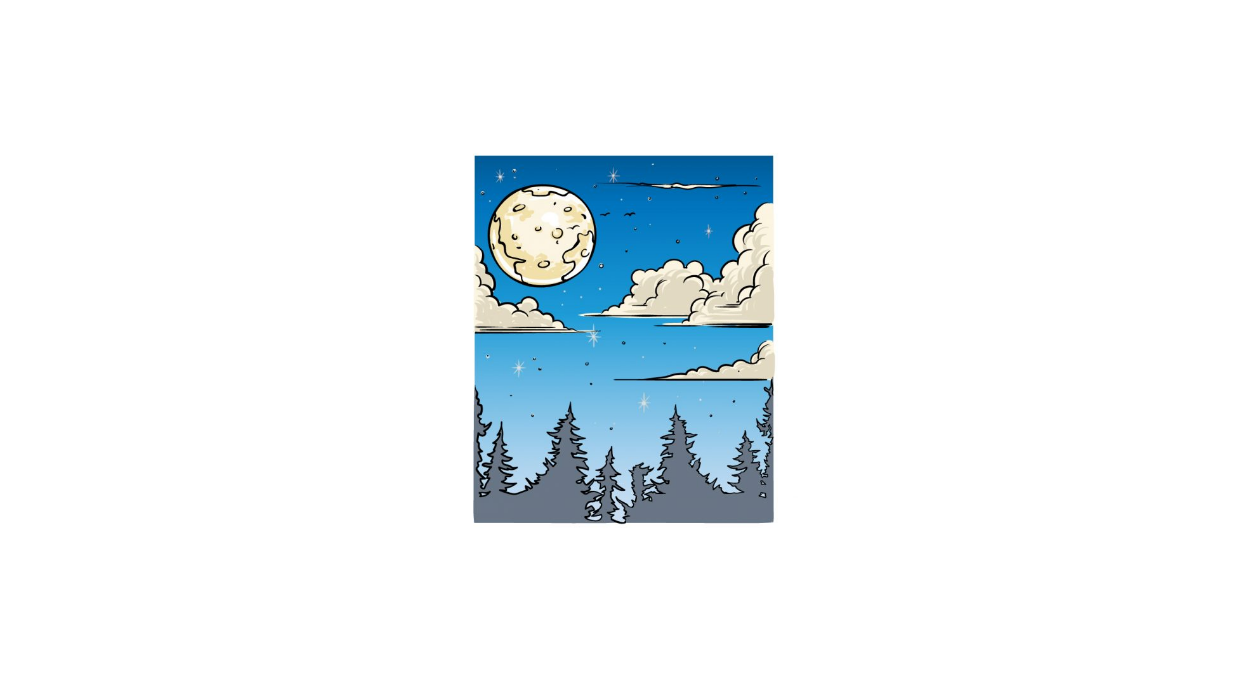
We’ll create a beautiful night scene in this guide to drawing the sky. To begin this scene, let’s start with the moon dominating the scene.
For this moon, we’ll start by drawing a simple circular shape. If you want a perfect circle for this moon, you can draw it with something like a drawing compass or stencil, but you can also do your best with a freehand circle.
However you end up drawing the circle, you can have some rounded shapes over it for extra detail.
Step 2
In this second part of your sky drawing, we’ll draw some clouds for the scene. These will help create that beautiful night mood!
To draw these clouds, we will use a flat line for the base of each cloud. Then you can draw the body of each cloud with an irregular line to create nice fluffy-looking shapes.
For this tutorial, we will draw three clouds in the sky, but you can draw more clouds if you want! You can also draw them in different shapes or sizes according to your preference.
Step 3
Later in this guide to drawing the sky, we’ll add a pine forest to the base of the drawing.
Seeing the night sky over a beautiful forest is always a wonderful sight, and we’re going to recreate that in this image.
The trees are seen as silhouettes, and you can use many sharper lines for the edges of the trees.
The line of trees is one long line going up and then back down to form the tree shapes, which are thick at the base and tapering towards the top.
Once you’ve drawn this line of trees, you’re ready for step 4.
Step 4
You now have all the outlines for your sky drawing, so we’ll finish with some minor details in the next few steps.
You can draw some small circles and line details for the moon to give it a more textured look.
Next, let’s focus on the clouds. Some jagged lines are drawn on these to make them look nice and fluffy.
In our image, we’ve also added another thin cloud to the bottom right of the image.
With these details drawn in, the next step is to add the finishing touches!
Step 5
This step of our guide to drawing the sky makes sure to make it even more spectacular with some finishing touches and details!
There are so many great ideas you could come up with, so this is where you can let your imagination run wild. First, for the details in our guide, we added many small shapes to the sky for some stars.
Once these are added, you can add some personal touches! You could draw an owl flying over the moon or add a gust of wind plowing through pine needles.
These are just a few suggestions, but do you have any ideas for adding your touch to this image? We can’t wait to see it!
Step 6
After all the last details and elements are drawn, you can focus on finishing your sky drawing with amazing colors.
In our reference image, we used a beautiful gradient in shades of blue for the sky to give it a nice atmospheric look.
Then we used very light shades of gray and beige for the clouds and moon to finish it.
These are the colors we chose for this image, but they are also suggestions. You should use as many colors and shades as you like!
Then you can choose which art media to use for the image.
You could create a nice painterly look with some watercolor or acrylic paints. Some colored pencils, crayons, or pencils would look great, too, so it’s up to you!
Your Sky Drawing is Finished!